Contact Form 7 聯繫表單入門

Contact Form 7 聯繫表單入門

本指南介紹了 WordPress 的 Contact Form 7 插件。需要 WordPress 管理的基本知識。本教程通過各種示例説明了如何在頁面上顯示錶單,以及如何自定義表單和郵件。

顯示錶格

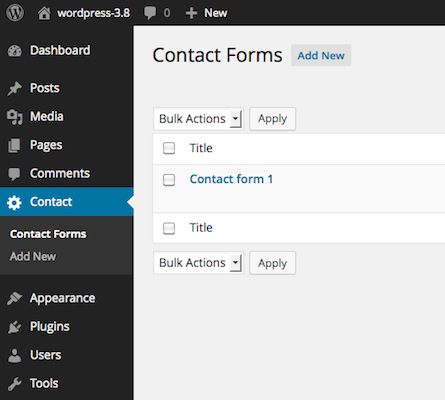
讓我們從在您的頁面上顯示一個表單開始。首先,打開 WordPress 管理屏幕上的聯繫 > 聯繫表單菜單。您可以在那裏管理多個聯繫表格。

聯繫表 7 的管理屏幕截圖


安裝 Contact Form 7 插件後,您將看到一個名為 「Contact form 1」 的默認表單,以及如下代碼:

[contact-form-7 id="1234" title="Contact form 1"]

複製此代碼。然後,打開您希望在其中放置聯繫表格的頁面 (頁面 > 所有頁面) 的編輯菜單。一種流行的做法是為聯繫表單頁面創建一個名為 「Contact」 的頁面。將您複製的代碼粘貼到頁面內容中。

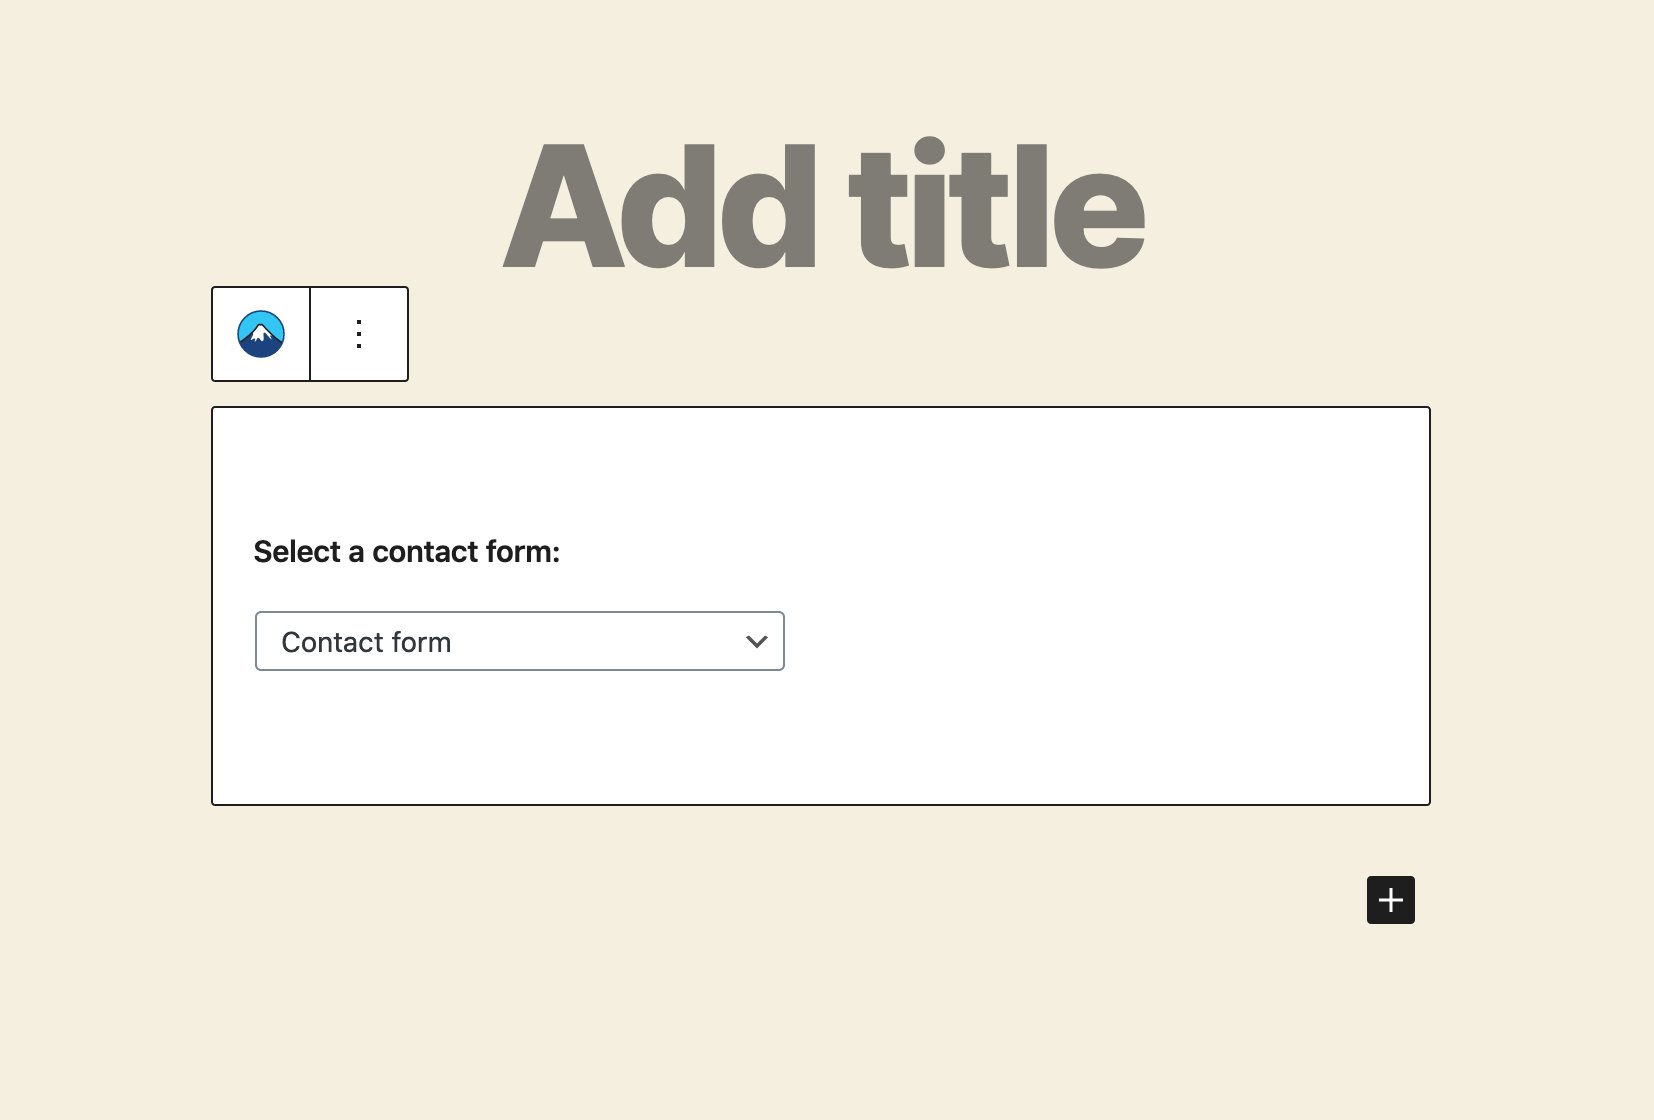
聯繫表格 7 5.3 及更高版本支持塊編輯器的聯繫表格選擇器塊。此塊允許您簡單地從您定義的聯繫表格列表中選擇一個聯繫表格,而不是複製和粘貼短代碼。

聯繫表單選擇器塊的屏幕截圖
聯繫表單選擇器塊的屏幕截圖


聯繫表單短代碼仍然可用,當您想要添加自定義屬性時,或者當您有太多聯繫表單無法在單個列表中顯示時,您會發現它們非常有用。

現在您的聯繫表格設置已完成。您網站的訪問者現在可以找到該表單並開始向您提交消息。

接下來,讓我們看看如何自定義表單和郵件內容。

自定義表單

您可能會覺得默認表單對您來説太簡單了,並且想要向其中添加更多字段。您可以在管理屏幕中編輯表單模板。

要將字段添加到表單,請為它們製作標籤並將它們插入到 「表單」 選項卡面板中的表單模板中。您會在表單模板中發現不熟悉的代碼,例如 [text* your-name]. 這些代碼在聯繫表 7 的詞彙表中稱為 「標籤」 。

標籤的語法相當複雜,但別擔心!你不必學習它。您可以使用標籤生成器工具生成任意數量的標籤

標籤中的第二個字是它的名字。例如,名稱[text* your-name]為 「您的姓名」 。此名稱很重要,因為它稍後會在您的郵件模板中使用。

自定義郵件

您可以像使用表單模板一樣在 「郵件」 選項卡面板中編輯郵件模板。您也可以在那裏使用標籤,但請注意郵件標籤與表單標籤不同。

您可以在郵件模板中使用的標籤在括號中僅包含一個單詞,看起來像 [your-name]. 您應該知道這個 「您的名字」 與前面示例中提到的表單標籤的名稱相同。這兩個標籤具有相同的名稱。

在郵件中,[your-name]將被用户的輸入值替換,該值通過相應的表單字段提交,在本例中為[text* your-name]

也可以看看

標籤的工作原理

標籤的工作原理

您可以使用各種類型的標籤 (用方括號括起來的字符串) 來編輯表單和電子郵件的模板。 Contact Form 7 為表單模板和電子郵件模板提供了兩種不同類型的標籤:form-tagsmail-tags

這兩種類型的語法完全不同。例如,您[text* your-name]在表單模板和[your-name]電子郵件模板中使用。

表單標籤語法表單標籤語法

表單模板中的標籤 (form-tag) 將被替換為 HTML 代碼段,該代碼段在呈現表單時表示輸入字段。表單標籤的組件可以分為四部分:類型、名稱、選項和值。

表單標籤示例

類型是最重要的因素,因為它定義了將替換自己的 HTML 元素的類型,以及期望通過它的輸入類型。

名稱用於標識輸入字段。大多數表單標籤都有一個名稱,但也有例外。

選項指定行為和外觀的細節。選項是可選的。

在大多數情況下,值用於指定默認值。這些值也可能用於其他目的;這取決於標籤的類型。值是可選的。

請注意,這些部分的順序很重要。選項不能在名稱之前,值不能在選項之前。

表單標籤類型列表

郵件標籤語法郵件標籤語法

郵件模板 (mail-tag) 中的標籤要簡單得多。郵件標籤中只有一個詞。在大多數情況下,這個詞對應一個表單標籤的名稱,它會被通過它輸入的表單替換。

郵件標籤示例

編輯表單模板

編輯表單模板

您可以在 「表單」 選項卡面板中編輯聯繫表單的表單模板。 HTML 和 Contact Form 7 的表單標籤可用於表單模板。

表單標籤用作 HTML 表單控件 (例如文本輸入字段) 或一組表單控件 (例如一組複選框) 的佔位符。呈現表單時,表單標籤被 HTML 替換。

表單標籤必須遵循特定的語法規則。否則,表單標籤將無法正常工作。不過,沒有必要記住語法,因為您可以使用標籤生成器工具來生成正確的表單標籤。

「表單」 選項卡面板的屏幕截圖


請注意,表單模板中的更改不會自動反映在聯繫表單的郵件設置中。因此,如果您已將表單標籤添加到表單模板,則需要在 「郵件」選項卡面板中的郵件設置中手動添加相應郵件標籤

設置郵件

設置郵件

您可以非常靈活地編輯電子郵件模板。不僅是郵件正文,您還可以編輯郵件標題字段。如果需要,您甚至可以在消息中使用 HTML 。

您可以在 「郵件」 選項卡面板中編輯電子郵件模板。

郵件選項卡的屏幕截圖
郵件標籤面板

字段到場

在此處設置收件人電子郵件地址。您可以在此字段中使用郵件標籤

在有效的郵箱語法中指定值,否則您將收到配置錯誤

從字段來自外地

在此處設置發件人電子郵件地址。您可以在此字段中使用郵件標籤

此字段值應該是與網站屬於同一域的電子郵件地址。否則你會得到一個配置錯誤

主題字段學科領域

在這裏設置消息的主題。您可以在此字段中使用郵件標籤

附加標題附加標題

您可以在此處插入其他消息頭字段,例如 Cc 和 Bcc 。每行應該有一個字段。您可以在這些字段中的任何位置嵌入郵件標籤

消息正文郵件正文

這是消息體;您可以在該字段的任何位置嵌入郵件標籤

如果您選中從輸出中排除帶有空白郵件標籤的行復選框,則包含具有空值的郵件標籤的行將從實際電子郵件輸出的郵件正文中排除。

默認情況下,純文本用於消息正文。要使用 HTML,請選中使用 HTML 內容類型複選框。

文件附件文件附件

如果您將上傳的文件附加到此電子郵件,請將上傳文件的郵件標籤放入文件附件字段。您還可以從服務器附加文件 (本地文件附件) 。

郵件 (2) 郵件 (2)

郵件 (2) 是一個附加的郵件模板。它通常用作自動回覆器,但您可以將其用於任何目的。僅當主郵件已成功發送時才發送郵件 (2) 。

也可以看看

Editing messages

Editing messages

You can edit messages used in various situations in the Messages tab panel. Some messages are notifications to the submitter of the status of the contact form, such as:

Thank you for your message. It has been sent.One or more fields have an error. Please check and try again.

Other messages are notifications that there is a validation error in the input field:

This field is required.This telephone number is invalid.

HTML tags or entities cannot be used in a message, so use plain text only. You』ll see a warning when you insert HTML into a message.

On the other hand, you can use Contact Form 7』s mail-tags in a message. This may be useful when you want to embed a user input into a message, like the following example:

Thanks [your-name], your message has been sent!

This [your-name] is a mail-tag that will be replaced with an actual user input through the your-name field.

See also

Contact form in your language explains how you can get the messages localized.
Share this:FacebookTwitterLike this:Like Loading...

其他設置

其他設置

您可以通過將特定格式的代碼片段添加到聯繫表單編輯器屏幕的 「附加設置」 選項卡面板中,為每個聯繫表單添加附加設置。

默認情況下,Contact Form 7 支持以下類型的設置。

僅限訂閲者模式

subscribers_only: true

您可能希望確保只有登錄用户才能提交您的聯繫表單。在這種情況下,請使用僅限訂閲者模式。在此模式下,未登錄用户無法提交聯繫表單,並且會看到一條消息,通知他們需要登錄,而登錄用户可以照常使用。

在僅限訂閲者模式下,不會為聯繫表單提供反垃圾郵件驗證,因為只有受歡迎的人才能使用它們。如果此假設不適用於您的站點,則僅限訂閲者模式可能不是您的好選擇。

演示模式

demo_mode: on

如果您 demo_mode: on 在 「附加設置」 字段中進行設置,則聯繫表單將處於演示模式。在這種模式下,聯繫表單將跳過發送郵件的過程,只顯示 「成功完成」 作為響應消息。

跳過郵件

skip_mail: on

該 skip_mail 設置的工作方式與 幾乎相同 demo_mode,但 skip_mail 僅跳過郵件發送。與 不同 demo_mode,skip_mail 不會影響其他活動,例如使用 Flamingo 存儲消息。

驗收作為驗證

acceptance_as_validation: on

默認情況下,接受複選框的行為與其他類型的字段不同;即使未選中該框,它也不會顯示驗證錯誤消息。如果您 acceptance_as_validation: on 在 「其他設置」 字段中進行設置,則聯繫表單中的接受複選框的行為方式與其他表單字段相同。

有關詳細信息,請參閲接受複選框

火烈鳥設置

您可以自定義 Flamingo 管理屏幕中顯示的主題和發件人字段值。有關更多詳細信息,請參閲使用 Flamingo 保存提交的消息

抑制消息存儲

do_not_store: true

此設置告訴消息存儲模塊,例如 Flamingo,不要通過此聯繫表單存儲消息。

JavaScript 代碼

on_sent_ok: "alert('sent ok');"  on_submit: "alert('submit');"

如果設置 on_sent_ok: 後跟一行 JavaScript 代碼,則可以告訴聯繫表單郵件發送成功時應執行的代碼。同樣,使用 on_submit:,您可以告訴在提交表單時應該執行的代碼,而不管結果如何。

另請參閲:使用 Google Analytics 跟蹤表單提交在提交後重定向到另一個 URL

注意: on_sent_okon_submit已從聯繫表 7 5.0 中正式刪除。您可以使用 DOM 事件代替這些設置。

與外部 API 集成

與外部 API 集成

這個聯繫表單插件的內置功能是有限的,但是,在各種外部服務的幫助下,您的聯繫表單的可能性是無限的。

您可以在 聯繫 > 集成 中管理與外部 API 的集成。列出了多個類別的服務。如果您對這些服務感興趣,請訪問他們的説明頁面以瞭解更多信息。

文本字段

文本字段

文本輸入字段是聯繫表單中最常見的因素。您可能知道,HTML 有兩種類型的文本輸入字段元素:<input type="text"> 用於單行輸入;和<textarea> 多行輸入。

Contact Form 7 提供了幾種類型的表單標籤來表示這兩種類型的 HTML 元素:文本字段(text 和 text*);電子郵件字段(email 和 email*);電話號碼字段(tel 和 tel*);URL 字段(url 和 url*);和文本區域(textarea 和 textarea*) 。在本文中,我將向您展示有關這些表單標籤的用法和語義的詳細信息。

文本域

兩個 text 和 text*用於單行輸入和接受任何形式的文字。它們之間的區別在於表示 text*必填字段。在聯繫表格 7 的約定中,所有類型的帶有星號 「*」 的標籤表示這些都是必填字段。

選項 例子 描述
id:(ID) id:foo idinput 元素的屬性值。
class:(班級) class:bar classinput 元素的屬性值。要設置兩個或更多類,您可以使用多個 class: 選項,例如 [text your-text class:y2008 class:m01 class:d01].
minlength:(數量) minlength:10 此輸入字段允許的最小長度
maxlength:(數量) maxlength:90 此輸入字段允許的最大長度
size:(數量) size:50 size 此輸入字段的 HTML 屬性值。
akismet:author 使用 Akismet 的選項。
placeholder
watermark
將該值用作佔位符文本而不是默認值。 watermark 作為 的別名工作 placeholder 。
default:user_login
default:user_first_name
default:user_last_name
default:user_nickname
default:user_display_name
用於檢索登錄用户信息作為字段默認值的選項。

這些字段的值可以為零或一,該值將用作輸入字段的默認值。

例子:

[text* your-name class:required "John Smith"]

電子郵件字段

這兩個 email 和 email*是單行輸入,只接受電子郵件地址。 email*是必填字段。

選項 例子 描述
id:(ID) id:foo idinput 元素的屬性值。
class:(班級) class:bar classinput 元素的屬性值。要設置兩個或更多類,您可以使用多個 class: 選項,例如 [email your-email class:y2008 class:m01 class:d01].
minlength:(數量) minlength:10 此輸入字段允許的最小長度
maxlength:(數量) maxlength:90 此輸入字段允許的最大長度
size:(數量) size:50 size 此輸入字段的 HTML 屬性值。
akismet:author_email 使用 Akismet 的選項。
placeholder
watermark
將該值用作佔位符文本而不是默認值。 watermark 作為 的別名工作 placeholder 。
default:user_email 用於檢索登錄用户信息作為字段默認值的選項。

這些字段的值可以為零或一,該值將用作輸入字段的默認值。

例子:

[email your-email "[email protected]"]

網址字段

這兩個 url 和 url*是單行輸入,只接受 URL 。 url*是必填字段。

選項 例子 描述
id:(ID) id:foo idinput 元素的屬性值。
class:(班級) class:bar classinput 元素的屬性值。要設置兩個或更多類,您可以使用多個 class: 選項,例如 [url your-url class:y2008 class:m01 class:d01].
minlength:(數量) minlength:10 此輸入字段允許的最小長度
maxlength:(數量) maxlength:90 此輸入字段允許的最大長度
size:(數量) size:50 size 此輸入字段的 HTML 屬性值。
akismet:author_url 使用 Akismet 的選項。
placeholder
watermark
將該值用作佔位符文本而不是默認值。 watermark 作為 的別名工作 placeholder 。
default:user_url 用於檢索登錄用户信息作為字段默認值的選項。

這些字段的值可以為零或一,該值將用作輸入字段的默認值。

例子:

[url your-url "http://example.com"]

電話號碼字段

這兩個 tel 和 tel*是單行輸入,只接受電話號碼。 tel*是必填字段。

選項 例子 描述
id:(ID) id:foo idinput 元素的屬性值。
class:(班級) class:bar classinput 元素的屬性值。要設置兩個或更多類,您可以使用多個 class: 選項,例如 [url your-url class:y2008 class:m01 class:d01].
minlength:(數量) minlength:10 此輸入字段允許的最小長度
maxlength:(數量) maxlength:90 此輸入字段允許的最大長度
size:(數量) size:50 size 此輸入字段的 HTML 屬性值。
placeholder
watermark
將該值用作佔位符文本而不是默認值。 watermark 作為 的別名工作 placeholder 。

這些字段的值可以為零或一,該值將用作輸入字段的默認值。

例子:

[tel your-tel "123-456-7890"]

文本區

這兩個 textarea 和 textarea*是一個多行輸入和接受任何形式的文本。 textarea*是必填字段。

選項 例子 描述
id:(ID) id:foo idtextarea 元素的屬性值。
class:(班級) class:bar classtextarea 元素的屬性值。要設置兩個或更多類,您可以使用多個 class: 選項,例如 [textarea your-text class:y2008 class:m01 class:d01].
minlength:(數量) minlength:10 此輸入字段允許的最小長度
maxlength:(數量) maxlength:90 此輸入字段允許的最大長度
placeholder
watermark
將該值用作佔位符文本而不是默認值。 watermark 作為 的別名工作 placeholder 。

這些字段可以有零個或一個值,該值將用作輸入字段的默認值。

例子:

[textarea your-message "your message here …"]

還有另一種方法可以為 textarea 字段設置默認值:

[textarea your-message]   foo   bar  [/textarea]

通過這種方式,您可以設置多行默認值。

演示

注意:這是一個演示。這種形式實際上不發送郵件。


查看上述表格的來源:

您的姓名 (必填)[text* your-name size:30 maxlength:60]    您的邮箱 (必填)[email* your-email "[email protected]"]    您的留言  [textarea your-message]  default value for a textarea  can be multi-line  like this  [/textarea]    [submit "发送"]

Number fields

Number fields

A number field is a field for numeric value input. Contact Form 7 3.4 and higher provides two types of form-tag for number fields: number and range. These work the same except that they provide different types of user interface.

The new form-tag types, number and range, correspond with the HTML5 input types number and range, respectively. Currently, only some modern browsers support these input types.

Even among modern browsers, there may be differences in how those input fields are rendered on screen. In most cases, a number input is rendered as a spinner control while a range input is rendered as a slider control.

Older browsers and some modern browsers don』t support these input types and just render them as traditional text input fields.

Number field#Number field

Both number and number* are used for number input and accept numeric value. number* is a required field.

OptionExamplesDescriptionmin:(num)min:10min attribute value of the input element. Allowed minimum value for this field.max:(num)max:99max attribute value of the input element. Allowed maximum value for this field.step:(num)step:3step attribute value of the input element. When minimum number is 10 and step is 3, acceptable inputs are 10, 13, 16, 19, …id:(id)id:fooid attribute value of the input element.class:(class)class:barclass attribute value of the input element. To set two or more classes, you can use multiple class: option, like [number your-text class:y2008 class:m01 class:d01].placeholderwatermark Use the value as placeholder text instead of as default value. watermark works as an alias of placeholder

These fields can have a zero or one value, and the value will be used as the default value of the input field.

Example:

[number* your-number min:10 max:99 step:3 class:required "40"]

Range field#Range field

Both range and range* are used for number input and accept numeric value. range* is a required field.

OptionExamplesDescriptionmin:(num)min:10min attribute value of the input element. Allowed minimum value for this field.max:(num)max:99max attribute value of the input element. Allowed maximum value for this field.step:(num)step:3step attribute value of the input element. When minimum number is 10 and step is 3, acceptable inputs are 10, 13, 16, 19, …id:(id)id:fooid attribute value of the input element.class:(class)class:barclass attribute value of the input element. To set two or more classes, you can use multiple class: option, like [number your-text class:y2008 class:m01 class:d01].placeholderwatermark Use the value as placeholder text instead of as default value. watermark works as an alias of placeholder

These fields can have a zero or one value, and the value will be used as the default value of the input field.

Example:

[range* your-range min:10 max:99 step:3 class:required "40"]
Share this:FacebookTwitterLike this:Like Loading...

Date field

Date field

HTML5 has introduced date input type. Browsers supporting this input type render a date field as a calendar-style date picker UI that you choose a date from. Contact Form 7 supports date and date* types of form-tag that correspond with date input type.

Currently, only some modern browsers support this date input type. Older browsers and some modern browsers including Firefox don』t support this input type and just render it as a traditional text input field. Fortunately, Contact Form 7 can provide a fallback for those browsers.

If a value is specified in a date field, the value must be in YYYY-MM-DD format (e.g. 2013-04-08) according to the HTML5 specification. This is in most cases you don』t need to care about because browser』s date picker UI will set a value in the correct format.

OptionExamplesDescriptionmin:(date)min:2013-01-01min attribute value of the input element. Allowed minimum value for this field. You can use a relative date format as well.max:(date)max:2013-12-31max attribute value of the input element. Allowed maximum value for this field. You can use a relative date format as well.step:(num)step:3step attribute value of the input element. When minimum date is 2013-01-01 and step is 3, acceptable inputs are 2013-01-01, 2013-01-04, 2013-01-07, …id:(id)id:fooid attribute value of the input element.class:(class)class:barclass attribute value of the input element. To set two or more classes, you can use multiple class: option, like [date your-date class:y2008 class:m01 class:d01].placeholderwatermark Use the value as placeholder text instead of as default value. watermark works as an alias of placeholder

These fields can have a zero or one value, and the value will be used as the default value of the input field.

Example:

[date* your-date min:2013-01-01 max:2013-12-31 step:7 class:required "2013-04-01"]

Specifying a date with relative date formats#Specifying a date with relative date formats

As well as YYYY-MM-DD format, you can use relative date formats to specify a date used in a date or date* form-tag. Contact Form 7 5.3 and later allows you to use all date formats that the DateTimeImmutable class supports.

Using this technique, you can specify a date with natural expressions—such as 「next Friday」, seen in the following example form-tag:

[date date-123 "next Friday"]

When you use date formats in a form-tag option, be aware that you are not allowed to use a space in an option value (as a space is used as the delimiter for options) and that you need to use an underscore (_) as substitute for a space. For example:

[date date-123 max:next_Friday+7days "next Friday"]

Format date value in mail#Format date value in mail

As previously explained, if a value is specified in a date field, the value must be in YYYY-MM-DD format (e.g. 2013-04-08). When the value is inserted into mail template, the date format keeps by default. To change the format in mail, you can use a variant of mail-tag notation [_format_{field name} "{date format}"].

Example:

[_format_your-date "D, d M y"]

D, d, M, and y in the above example are date format character described in the manual page of PHP date() function. "D, d M y" will format 2013-04-08 as Mon, 08 Apr 13. As the format is affected by localization, with the same "D, d M y" format, 2013-04-08 will become 月, 08 4 月 13 in Japanese-localized WordPress.
Share this:FacebookTwitterLike this:Like Loading...