Constant Contact 集成

Constant Contact 集成

披露:此說明的作者是常聯繫會員,這意味著如果您決定通過插件作者的鏈接進行購買,插件作者將獲得傭金,您無需支付任何費用。

Constant Contact 集成模塊允許您將通過您的聯繫表格收集的聯繫數據發送到 Constant Contact API 。您可以通過幾個簡單的步驟創建可靠的電子郵件訂閱服務。

您需要一個 Constant Contact 用戶帳戶才能使用此集成。如果您還沒有帳戶,請先註冊以創建一個帳戶,然後再繼續。

連接到 API 連接到 API

此集成模塊使用 Constant Contact V3 API 。要從您的 WordPress 網站開始使用 API,您首先需要註冊一個應用程序以獲取稍後將使用的 API 密鑰和應用程序機密。

要註冊應用程序,請移至 app.constantcontact.com 上的 「我的應用程序」 頁面,然後單擊右上角的 「新建應用程序」 按鈕。

系統會要求您提供應用程序名稱。您可以隨時更改名稱,所以暫時將其命名為 「Contact Form 7 Integration for (your site title) 」 。

Constant Contact 新應用模式的截圖
新建應用程序模式對話框

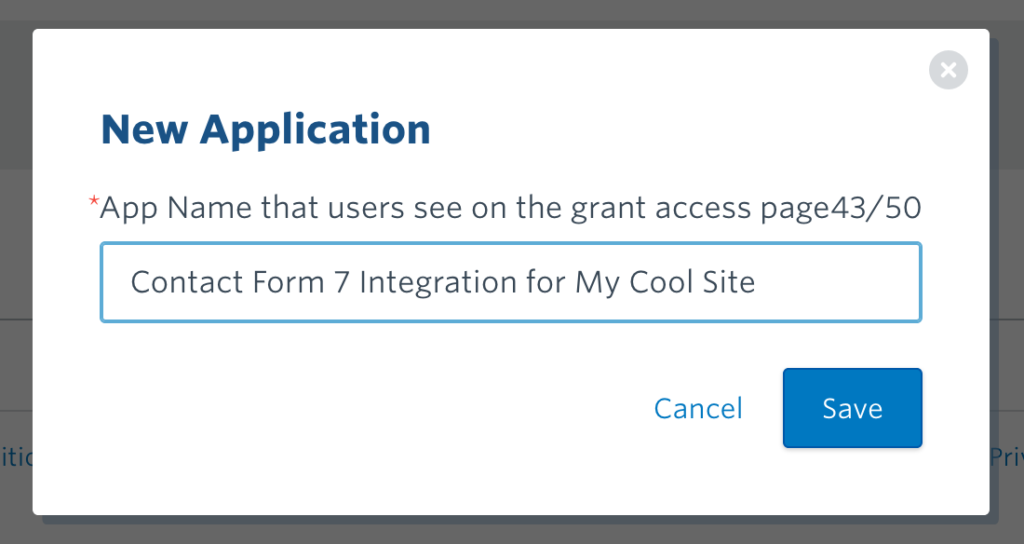
單擊保存,然後您將被定向到詳細信息頁面。

詳情頁面截圖
詳情頁面

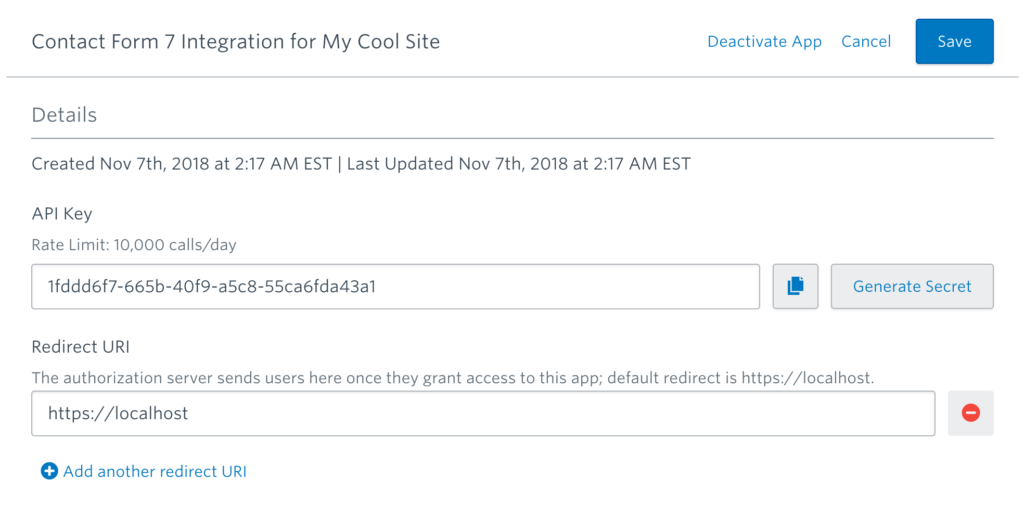
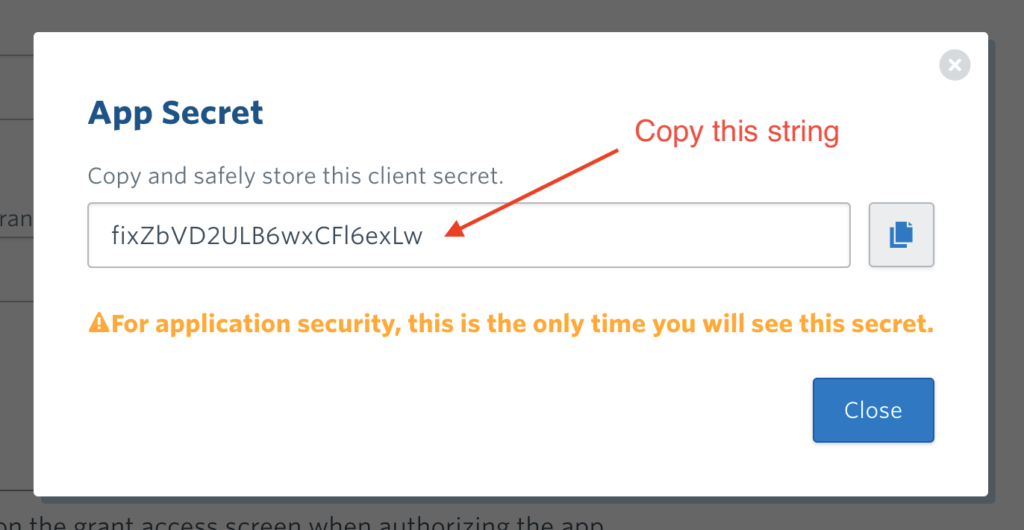
在詳細信息頁面上,您將在第一個欄位中找到 API 密鑰。單擊 API Key 欄位旁邊的 Generate Secret 按鈕以生成應用程序密鑰。複製 API 密鑰和應用程序機密,因為您將在下一步中使用它們。

App Secret 模態對話框的屏幕截圖
App Secret 模態對話框

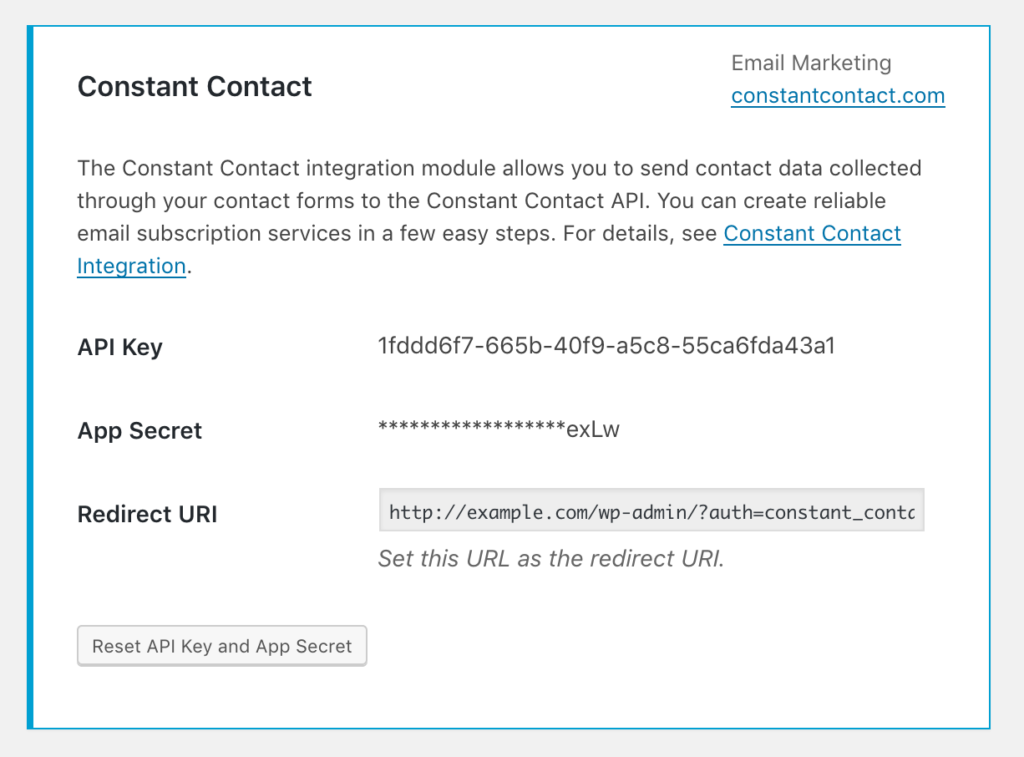
接下來,在瀏覽器的另一個選項卡中打開 WordPress 網站的管理屏幕。移動到 Contact > Integration 菜單頁面,找到一個名為 Constant Contact 的框。

WordPress 管理屏幕截圖(聯繫 > 集成菜單)
聯繫 > 集成菜單頁面

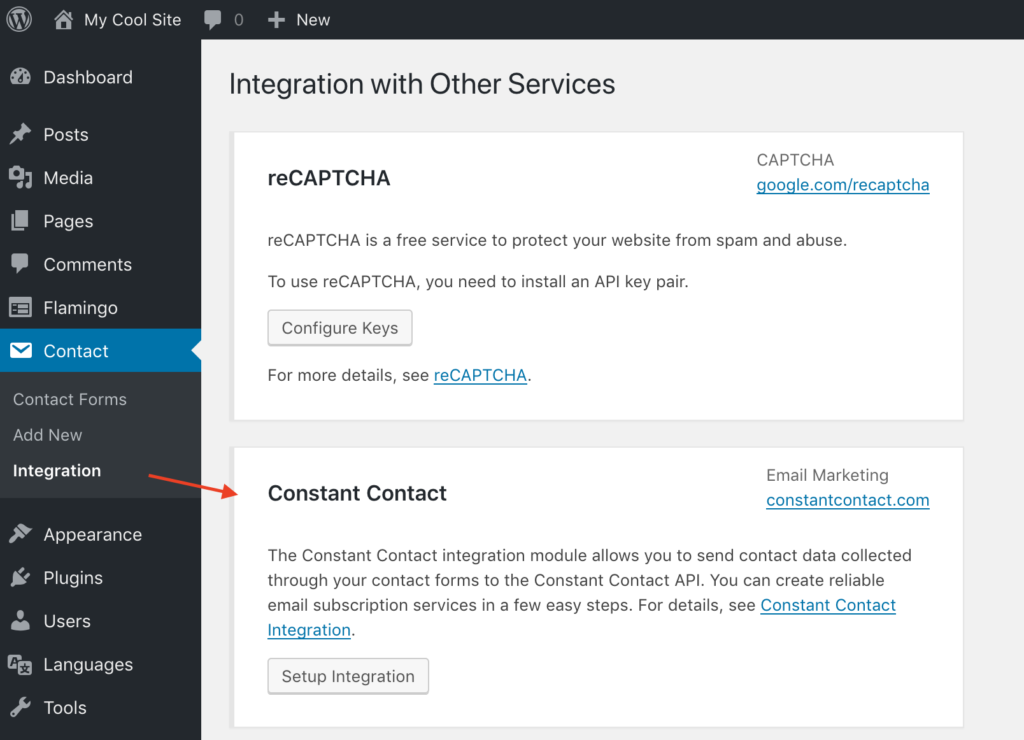
單擊設置集成按鈕;它將顯示一些輸入欄位。將您在上一步中複製的字元串粘貼到 API Key 和 App Secret 欄位中。

聯繫人 > 集成菜單頁面的屏幕截圖
設置集成

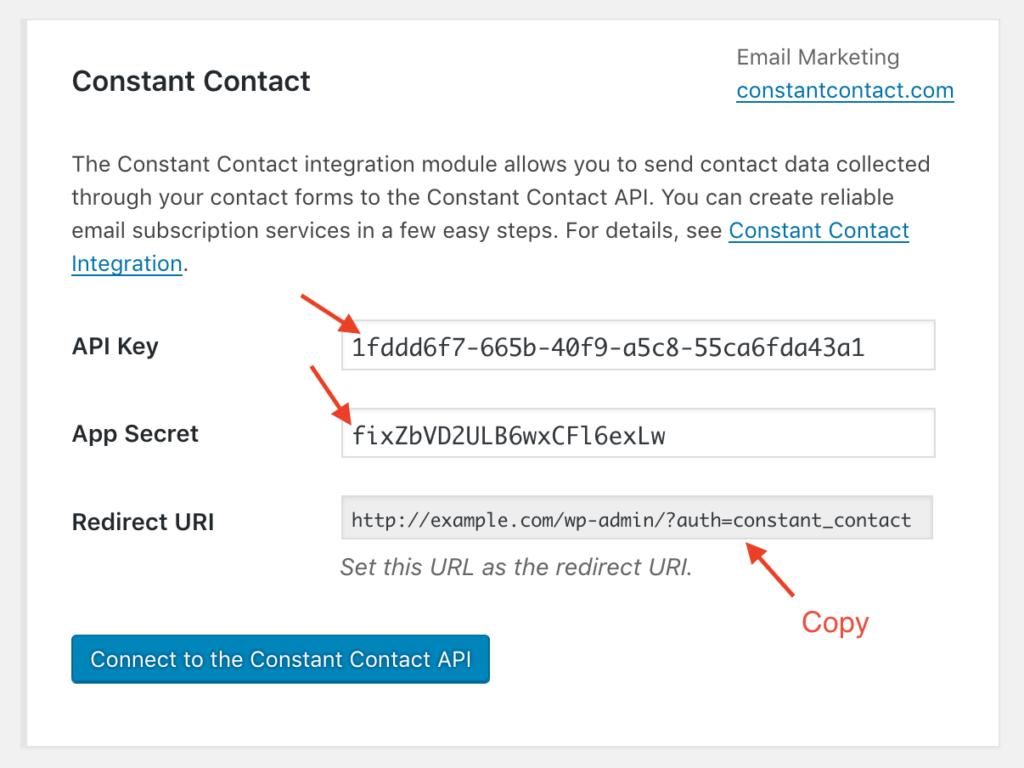
您將在兩個欄位下找到 Redirect URI 只讀欄位。複製此欄位值並將其粘貼到 app.constantcontact.com 上 「詳細信息」 頁面上的 「重定向 URI」 欄位中。

app.constantcontact.com 上詳細信息頁面的屏幕截圖
粘貼重定向 URI 後的詳細信息頁面

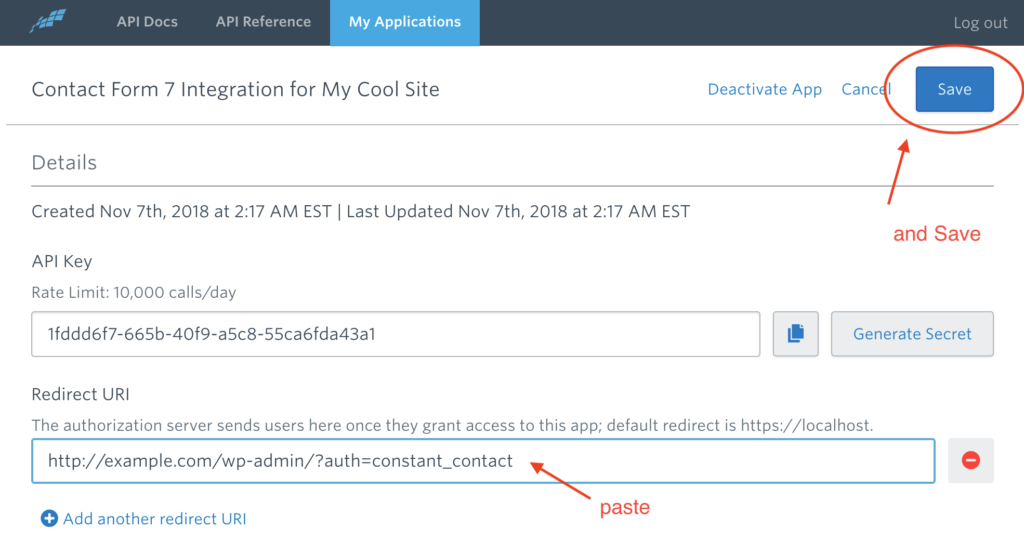
在 「詳細信息」 頁面上更改欄位值後,單擊右上角的 「保存」 按鈕。

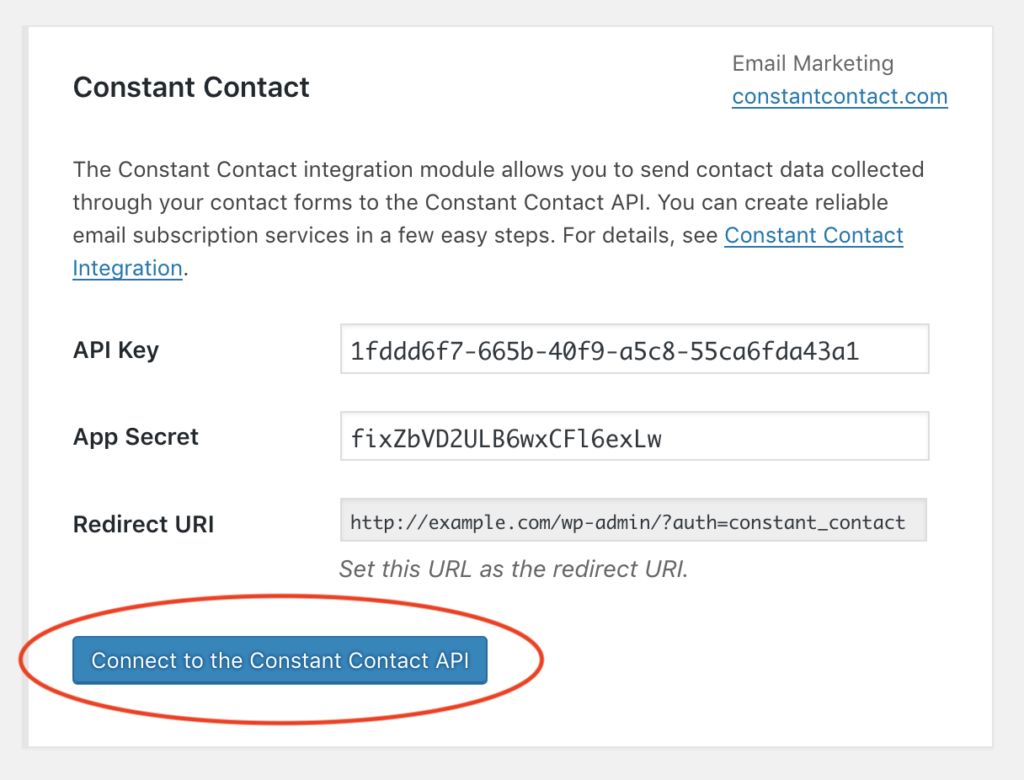
現在,您幾乎完成了必要的設置。返回 WordPress 管理屏幕中的 Contact > Integration 菜單頁面,然後單擊 Connect to the Constant Contact API 按鈕開始授權過程。

Connect to the Constant Contact API 按鈕的屏幕截圖
連接到 Constant Contact API 按鈕

如果您已正確設置所有內容,您將被定向到 Constant Contact 登錄頁面(如果您尚未登錄),並會被要求授權您註冊的應用程序以訪問您的 Constant Contact 帳戶.

授權屏幕截圖
授權畫面

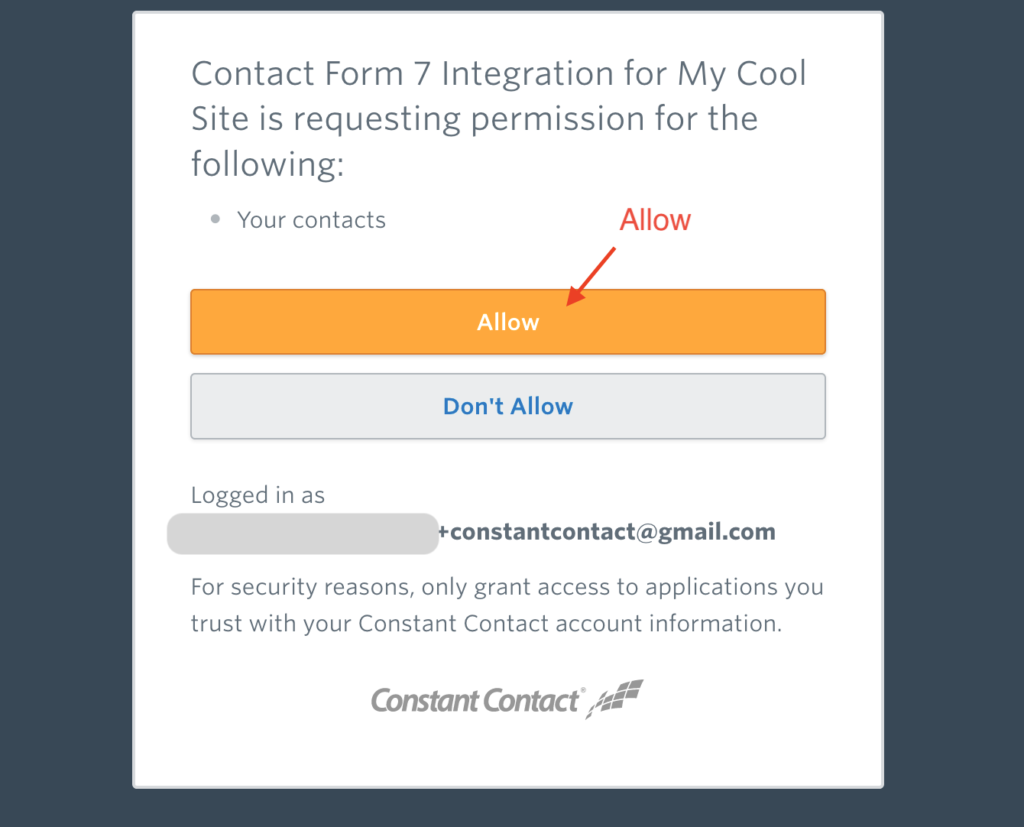
之後,您將被重定向回 WordPress,並發現框的邊框顏色已更改為藍色。藍色邊框表示已成功創建與 API 的連接。

授權後的Constant Contact Integration框截圖
授權完成

聯繫人屬性映射聯繫人屬性映射

現在,您的聯繫表單和 Constant Contact API 已連接。

每次收到有效的表單提交時,Contact Form 7 都會向 Constant Contact API 發送一個請求,讓 Constant Contact 根據提交將聯繫人數據添加到其資料庫中。

Constant Contact 的聯繫人數據由不同類型的屬性組成,例如名字、姓氏、電子郵件地址、電話號碼、職位、生日等。要構建對 API 的請求,Contact Form 7 需要知道哪個輸入欄位聯繫表的哪個屬性對應 Constant Contact 的聯繫數據的哪個屬性。

Contact Form 7 使用以下基於名稱的映射表來確定輸入欄位和聯繫人屬性之間的對應關係。例如,如果 [email* your-email] 表單中有 form-tag (name: your-email),則通過該欄位的值將用於 email_address 聯繫人的屬性。

表單欄位名稱 聯繫物業
your-first-name first_name
your-last-name last_name
your-name first_name 和 last_name(*1)
your-email email_address
your-job-title job_title
your-company-name company_name
your-birthday-month birthday_month
your-birthday-day birthday_day
your-birthday birthday_month 和 birthday_day(*2)
your-anniversary anniversary
your-phone-number phone_numbers
your-address-street street_addresses.street
your-address-city street_addresses.city
your-address-state street_addresses.state
your-address-postal-code street_addresses.postal_code
your-address-country street_addresses.country

*1 — 如果表單中沒有 your-first-nameoryour-last-name 欄位但有一個 your-name 欄位,則 your-name 欄位值的第一個單詞將用於 first_name 聯繫屬性,其餘的將用於 last_name 屬性。

*2 — 如果表單中沒有 your-birthday-month 和 your-birthday-day 欄位,但有 your-birthday 一個日期值為 YYYY-MM-DD 格式的欄位,則該值的月和日部分將分別用於 birthday_month 和 birthday_day 聯繫人屬性。

在某些情況下,您可能覺得此映射不適合您的實際表單欄位。對於這種情況,Contact Form 7 提供了 wpcf7_constant_contact_contact_post_request_builder 過濾器鉤子。雖然它需要一些 PHP 編碼來創建過濾器功能,但您可以使用此過濾器自定義聯繫人創建請求中的任何內容。

強烈建議您在將聯繫人數據添加到訂閱列表之前獲得聯繫表單提交者的明確同意。這不僅是因為未經同意收集和使用個人數據是非法的。這也是因為將電子郵件發送給非預期接收者會導致垃圾郵件投訴率很高。

對於檢查提交者是否同意將其聯繫數據添加到 Constant Contact 訂閱列表的表單欄位,Contact Form 7 提供了 consent_for:constant_contactform-tag 選項。您可以使用以下示例中的選項:

[接受您的同意可選 consent_for:constant_contact]
將我添加到 Constant Contact 訂閱列表。
[/驗收]

如果您的聯繫表單中有此表單標籤(接受複選框),則僅當提交者選中該複選框以確認他們的同意時,Contact Form 7 才會將聯繫數據發送到 Constant Contact API 。

指定聯繫人列表指定聯繫人列表

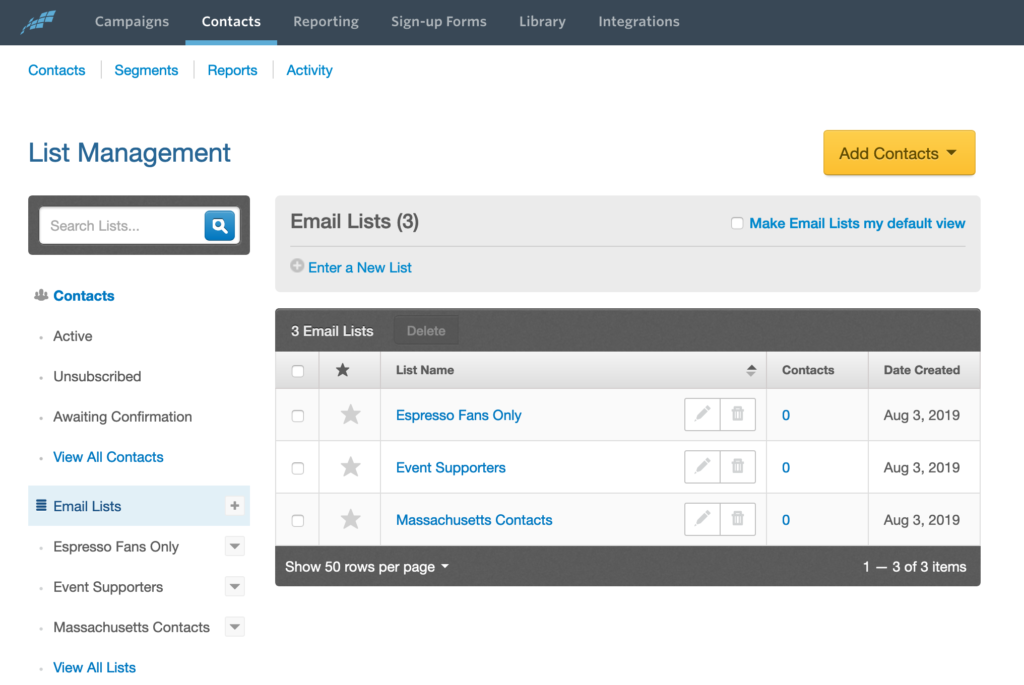
Constant Contact 允許您將收集到的聯繫人數據分組到聯繫人列表(也稱為 「電子郵件列表」 或簡稱 「列表」)中。

描述如何管理聯繫人列表的 Constant Contact 儀錶板的屏幕截圖。
常聯繫列表管理頁面

Contact Form 7 的 Constant Contact Integration 支持為通過您的聯繫表格收集的新聯繫人指定聯繫人列表。

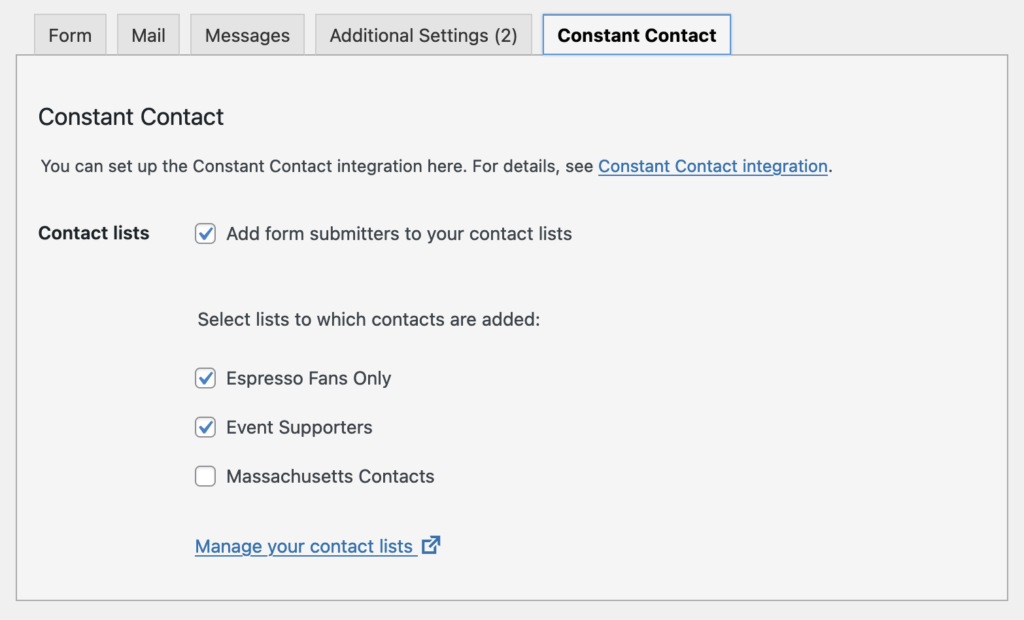
如果您還沒有聯繫人列表,請轉至 「 Constant Contact」 儀錶板並嘗試創建您的第一個列表。然後,返回 WordPress 管理屏幕。在聯繫表單編輯器屏幕中,您會發現在那裡添加了 Constant Contact 選項卡面板。在此選項卡面板中,如果您想通過此聯繫人表單向聯繫人列表添加新聯繫人,請選中聯繫人列表複選框,然後選擇聯繫人列表。

Constant Contact 選項卡面板的屏幕截圖
恆定接觸選項卡面板

上次修改 2021.12.27

Spam filtering with Akismet

Spam filtering with Akismet

Spammers target everything and your contact forms are no exception.

Contact Form 7 provides several spam protection modules; we recommend utilizing different types in combination.

Akismet is a powerful anti-spam service provided by Automattic that protects your contact forms. Spam filtering with Akismet forms the centerpiece of our spam prevention strategy.

Activating Akismet#Activating Akismet

The first step is to activate the Akismet plugin. Since the plugin package of Akismet is bundled with WordPress, there is no need to manually install it. Move to the Plugins menu and simply activate the plugin titled Akismet Anti-Spam.

You need an API key to use Akismet. If you use it on a personal blog, you can get an API key for free. For corporate or commercial sites, paid subscriptions are available.

For people considering the paid subscriptions, we recommend Jetpack 「Personal」 or upper plans. Jetpack is the total solution package for WordPress and is provided by the same company as Akismet. In addition to Jetpack』s wide variety of features, the 「Personal」 and upper plans include an Akismet subscription that is equivalent to the Akismet 「Plus」 plan.

Deploying Akismet in a contact form#Deploying Akismet in a contact form

The primary purpose of Akismet is to protect WordPress comment forms. To use Akismet to protect Contact Form 7, you need to give specific options to input fields (form-tags).

There are three Akismet-related options:

akismet:author

You give this option to the field where submitters input their names.

Example: [text* your-name akismet:author]

akismet:author_email

You give this option to the field where submitters input their email addresses.

Example: [email* your-email akismet:author_email]

akismet:author_url

You give this option to the field where submitters input the URL of their websites.

Example: [text your-url akismet:author_url]

To deploy Akismet in a contact form, use one or more of these options in the form. To get accurate results, you are advised to use as many options as possible.

Where Akismet is deployed, Contact Form 7 sends data to Akismet when a user submits the form. The data are composed of all user inputs (not only the fields with an akismet:* option) and variables from the environments. Akismet will verify the data to respond with a 「spam」 or 「ham」 answer.

If a 「spam」 answer is the response, Contact Form 7 will suspend the email and show a message saying, 「There was an error trying to send your message,」 surrounded by an orange border.

Testing the spam filtering#Testing the spam filtering

To test if the spam filtering is working correctly, try inputting 「viagra-test-123」 into the name (akismet:author) field or 「[email protected]」 into the email (akismet:author_email) field, and submitting the form. With these magic words reserved for testing, Akismet must return a 「spam」 response. If it is working as expected, you』ll see an orange-bordered error message.

Reporting false detection#Reporting false detection

Automated spam filtering cannot be 100% accurate. False positives (ham incorrectly classified as spam) and false negatives (spam incorrectly classified as ham) will exist. When you find messages are treated incorrectly by Akismet, you can report the false detection. Akismet learns from the information you report, and the accuracy of the spam filtering algorithm will be improved.

To report false detections to Akismet, you need the Flamingo plugin activated because Contact Form 7 doesn』t come with the ability to store submission data into the database. You can view messages through contact forms in the Flamingo > Inbound Messages menu. Normal messages are in the Inbox list, and spam messages are in the Spam list.

When you find a message in the Inbox list that should have been marked as spam, open the message and change the Status to Spam. Flamingo automatically sends a false negative report to the Akismet API. Likewise, change the status to Not Spam when you find a normal message in the Spam list. Flamingo properly reports false positives to Akismet.

Share this:FacebookTwitterLike this:Like Loading…

Restricting access to the administration panel

Restricting access to the administration panel

In its default settings, Contact Form 7 allows all users except subscriber users to have access to the administration panel; but allows only administrator and editor users to edit contact forms. You might feel that you would want to change this setting to restrict access even more, so I will show you how to do this in this article.

For example, let』s change access to allow only administrator users access and editing rights. You can do this by editing your wp-config.php and inserting these lines:

define( ‘WPCF7_ADMIN_READ_CAPABILITY’, ‘manage_options’ );
define( ‘WPCF7_ADMIN_READ_WRITE_CAPABILITY’, ‘manage_options’ );

WPCF7_ADMIN_READ_CAPABILITY holds the minimum capability required for access to the administration panel, while WPCF7_ADMIN_READ_WRITE_CAPABILITY holds the minimum capability required for editing contact forms. Obviously WPCF7_ADMIN_READ_WRITE_CAPABILITY should be stricter than WPCF7_ADMIN_READ_CAPABILITY, as you cannot edit contact forms without accessing the administration panel.

manage_options is a capability that normally only administrator users have. So setting manage_options to both WPCF7_ADMIN_READ_CAPABILITY and WPCF7_ADMIN_READ_WRITE_CAPABILITY allows only those administrator users access and editing rights.

You can set any capabilities you wish to these constants to fine-tune the restrictions. If you want to learn further about WordPress』 Roles and Capabilities concepts, and to learn more about what capabilities are available, check WordPress support document.
Share this:FacebookTwitterLike this:Like Loading…

Custom layout for checkboxes and radio buttons

Custom layout for checkboxes and radio buttons

In its default settings, Contact Form 7 renders checkboxes and radio buttons as inline boxes. You can customize this using some form-tag options and simple CSS.

Reversing checkbox-label order

By default, Contact Form 7 renders a checkbox in front of its label like the following:

You can reverse this order by adding label_first option to the checkbox tag.

[checkbox your-cb label_first “Option 1” “Option 2” “Option 3”]

Rendering checkboxes as block instead of original inline

To render checkboxes as block boxes, add a line of CSS style rule to your theme』s stylesheet:

1span.wpcf7-list-item { display: block; }

Rendering checkboxes as a table

To render checkboxes as a table, add these CSS style rules to your theme』s stylesheet:

12span.wpcf7-list-item { display: table-row; }span.wpcf7-list-item * { display: table-cell; }

(Combined with label_first option)

See also

Checkboxes, radio buttons and menusStyling contact form

Share this:FacebookTwitterLike this:Like Loading…

Loading JavaScript and stylesheet only when it is necessary

Loading JavaScript and stylesheet only when it is necessary

In its default settings, Contact Form 7 loads its JavaScript and CSS stylesheet on every page. You might think it would be redundant or wasteful, and want to load them only on those pages that contain contact forms. I understand the feeling, but there is a technical difficulty for a plugin in knowing whether the page contains contact forms or not at the start of loading. However, I can show you a way to work around that.

Step 1: Stop loading the JavaScript and CSS stylesheet on all pages

When the value of WPCF7_LOAD_JS is set to false (default: true), Contact Form 7 does not load the JavaScript. You can set the value of this constant in your wp-config.php like this:

define( ‘WPCF7_LOAD_JS’, false );

Likewise, you can control the loading of the CSS stylesheet with WPCF7_LOAD_CSS. Contact Form 7 does not load the CSS stylesheet when the value of WPCF7_LOAD_CSS is false (default: true). You can set it in the wp-config.php like this:

define( ‘WPCF7_LOAD_CSS’, false );

Or, you can also disable the loading of the JavaScript and CSS by adding a few lines of code into your theme』s functions.php file, like this:

add_filter( ‘wpcf7_load_js’, ‘__return_false’ );
add_filter( ‘wpcf7_load_css’, ‘__return_false’ );

Now you have succeeded in stopping the loading of the JavaScript and CSS stylesheet, but, unfortunately, you』ve also killed them on pages that contain contact forms — so we really need to get them back on the right pages. So, the next step is what you』ll need to load the files on to the explicit pages in which you need them.

Step 2: Load the files on pages which contain contact forms

For example, let』s say you have a page named 「Contact」 and it is the only page that contains a contact form. And suppose that you have a template file for the 「Contact」 page named 『contact.php』 in your theme folder. Now you will need to load Contact Form 7』s JavaScript and CSS stylesheet specifically on the 「Contact」 page.

To do this, you must edit the 『contact.php』 template file and insert the following lines into it:

Note that wpcf7_enqueue_scripts() and wpcf7_enqueue_styles() must be called before wp_head() is called.
Share this:FacebookTwitterLike this:Like Loading…

Tracking form submissions with Google Analytics

Tracking form submissions with Google Analytics

If you use Google Analytics to monitor web traffic on your site, you may also want to track contact form submissions. In this article, I』ll introduce a simple way to track submissions with Google Analytics.

Note that the JavaScript code used in this article is based on the latest version of the Google Analytics library at the time of this post (analytics.js). If you use the legacy library (ga.js), you will need to change the code in the following examples according to Google』s guide.

First, take a look at the HTML source of your site and confirm that you have a code snippet like the following:

(function(i,s,o,g,r,a,m){i[‘GoogleAnalyticsObject’]=r;i[r]=i[r]||function(){
(i[r].q=i[r].q||[]).push(arguments)},i[r].l=1*new Date();a=s.createElement(o),
m=s.getElementsByTagName(o)[0];a.async=1;a.src=g;m.parentNode.insertBefore(a,m)
})(window,document,’script’,’//www.google-analytics.com/analytics.js’,’ga’);

ga(‘create’, ‘UA-XXXXX-Y’, ‘auto’);
ga(‘send’, ‘pageview’);

If not, you haven』t finished installing the basic page tracking code for Google Analytics yet; install that first.

Event tracking#Event tracking

A form submission can be tracked as an event. To send a form submission event to Google Analytics, call the JavaScript function as follows:

ga( ‘send’, ‘event’, ‘Contact Form’, ‘submit’ );

You probably want to track a submission event only when mail has been sent successfully. Contact Form 7 triggers wpcf7mailsent custom DOM event when it has sent mail, so let』s call the function within an event handler the following:

document.addEventListener( ‘wpcf7mailsent’, function( event ) {
ga( ‘send’, ‘event’, ‘Contact Form’, ‘submit’ );
}, false );

The final step is inserting this JavaScript code snippet into the HTML header () of each page. You can edit your theme』s header.php template, or you can use wp_head action hook from the theme』s functions.php.

You of course need to wrap the code with tag when you embed script code into HTML:

document.addEventListener( ‘wpcf7mailsent’, function( event ) {
ga(‘send’, ‘event’, ‘Contact Form’, ‘submit’);
}, false );

If you have set up everything correctly, Google Analytics will track successful form submissions through contact forms as an event with Contact Form as the event category, and submit as the event action.

To verify this is working correctly, you can check the Behavior > Events > Overview report page on Google Analytics 24-48 hours after a submission; at that point, tracked events should be recorded there.

Note: The method using on_sent_ok hook is no longer recommended. This function is scheduled to be abolished by the end of 2017.
Share this:FacebookTwitterLike this:Like Loading…

Locating response message box anywhere

Locating response message box anywhere

After a visitor of your blog submits the contact form, the visitor sees a response message from Contact Form 7, such as 「Your message was sent successfully」 or 「Validation errors occurred.」 I sometimes hear from users who tell me that the position of the response message is not good, and, in fact, sometimes their visitors miss the message entirely.

The response message is shown at the bottom of the form by default. You can change the location by putting a response message placeholder [response] inside the form. You can insert this [response] tag into any place of your choice. You can use it multiple times in a form. The response message will be shown within the placeholder after submission.

Demo

Note: This is a demo. This form doesn』t send a mail practically.

Your Name (required)

Subject

Your Message

Δ

View source of above form:

[response]

Your Name (required)
[text* your-name]

Subject
[text your-subject]

Your Message
[textarea your-message]

[response]

[submit “Send”]
Share this:FacebookTwitterLike this:Like Loading…

Selectable recipient with pipes

Selectable recipient with pipes

Imagine that you are a webmaster of a company and you need a contact form on your site which will let the sender to select an email recipient. Let』s say that the options are the CEO of the company ([email protected]), the sales department ([email protected]) and the support department ([email protected]).

You』ve been able to achieve this with Contact Form 7 in this way: first, make a drop-down menu or radio button for the selection (you can do this by inserting a form-tag such as:

[select your-recipient “[email protected]
[email protected]
[email protected]”]

into the form template); second, enter a corresponding mail-tag [your-recipient] into the To field in the Mail tab panel. This ensures that the email is sent to the specific address that the sender selected.

However, there has been a problem with this. By using this procedure, the email addresses are revealed over the Internet and this is not good. These addresses could then become targets of evil spammers very quickly.

So, what you need is a way to allow senders to select from closed data safely. The pipe (『|』) support is just for this very purpose.

Change the form-tag of the drop-down menu to:

[select your-recipient “CEO|[email protected]
“Sales|[email protected]
“Support|[email protected]”]

If you insert a pipe (『|』) character in the middle of the option value, only the part before the pipe will be open to the outside, and the part after the pipe will be used for mail replacement.

To get the value after pipe character, put the usual mail-tag corresponding to the form-tag ([your-recipient] in the case of the preceding example) in the mail templates. To get value before pipe, you can use [_raw_{field name}] ([_raw_your-recipient] in the case of the preceding example).

You can use this usage of pipe only in the drop-down menu values, radio buttons or checkboxes. If you don』t like this feature, you may define the constant WPCF7_USE_PIPE as false to disable it.
Share this:FacebookTwitterLike this:Like Loading…

Adding Cc, Bcc and other mail headers

Adding Cc, Bcc and other mail headers

Contact Form 7 has setting fields for mail headers of To, From and Subject. Have you ever thought of adding Cc or Bcc headers to your email? Additional Headers fields in the Mail and Mail (2) sections are just for that purpose.

You can input any header lines into the field; and you can insert any mail-tags into any place in each header line, just like other Mail fields.

Share this:FacebookTwitterLike this:Like Loading…

Contact form in your language

Contact form in your language

You don』t need extra multilingual plugins to manage contact forms in your language. By going to the WordPress admin screen (WordPress has a standardized localization mechanism), you can switch the language used in the contact form editor user interface and you can switch the language used for the default template for newly created contact forms.

Localizing contact form editor UI

To switch the language used for admin screens, move to Users > Your Profile admin menu page. You』ll find the language selector there.

The language used for the screens under the Contact menu will follow your language setting. If not, make sure that: 1) a language pack for the language is available on the translate.wordpress.org site, and 2) the latest version of the language pack is installed on your site.

Localizing default contact form template

After setting the UI language, move to Contact > Add New menu page to create a new contact form. If both the UI language and the language pack for Contact Form 7 have been correctly set up, the contents in the Form, Mail, and Messages tab panels should be localized for your language. If not, once again, make sure the latest language pack is installed.

If you find the language pack for your language isn』t available yet or isn』t maintained well, it』s time to contribute to the plugin translation.
Share this:FacebookTwitterLike this:Like Loading…